In this article, we will discuss the usage of SpringApplication class in Spring boot applications.
The SpringApplication class provides a convenient way to bootstrap a Spring application that is started from a main() method. By default SpringApplication class will perform the following steps to bootstrap your application:
package net.guides.springboot2;

import org.springframework.boot.SpringApplication;
import org.springframework.boot.autoconfigure.SpringBootApplication;

@SpringBootApplication
public class Application {
    public static void main(String[] args) {
         SpringApplication.run(Application.class, args);
    }
}
For more advanced configuration a SpringApplication instance can be created and customized before being run:
public static void main(String[] args) {
   SpringApplication application = new SpringApplication(MyApplication.class);
   // ... customize application settings here
   application.run(args)
}SpringApplication class automatically creates the ApplicationContext from the classpath, scan the configuration classes and launch the application. This class is very helpful in launching Spring MVC or Spring REST application using Spring Boot.
import org.springframework.boot.SpringApplication;
import org.springframework.boot.autoconfigure.SpringBootApplication;
import org.springframework.context.ApplicationContext;

@SpringBootApplication
public class HelloWorldApplication {
    public static void main (String[] args) {
        ApplicationContext ctx =
                    SpringApplication.run(HelloWorldApplication.class, args);
    }
}
It also runs an embedded Tomcat server in Spring web application.
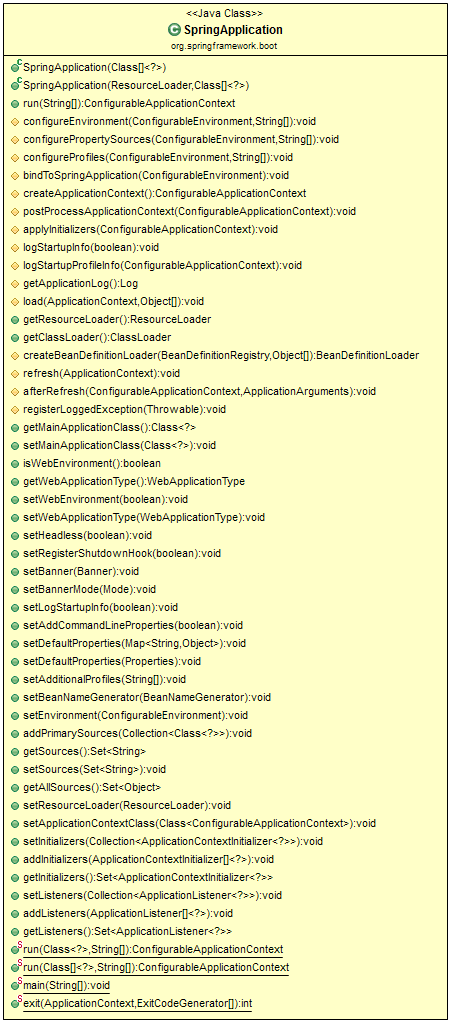
Let's discuss few important APIs/Methods of SpringApplication class. The below diagram shows a list of public methods provided by SpringApplication class. You can find more about each method at SpringApplication API Doc.
There are many options to change the banner. The simplest way is by adding a banner.txt file to your classpath or by setting the spring.banner.location property to the location of such a file. If the file has an encoding other than UTF-8, you can set spring.banner.charset.
The SpringApplication.setBanner(… ) method can be used if you want to generate a banner programmatically. Use the org.springframework.boot.Banner interface and implement your own printBanner() method.
If the SpringApplication defaults are not to your taste, you can instead create a local instance and customize it. For example, to turn off the banner, you could write:
public static void main(String[] args) {
    SpringApplication app = new SpringApplication(MySpringConfiguration.class);
    app.setBannerMode(Banner.Mode.OFF);
    app.run(args);
}
Note that you can customize defaults by providing appropriate properties to SpringApplication class.
If you need to build an ApplicationContext hierarchy (multiple contexts with a parent/child relationship) or if you prefer using a “fluent” builder API, you can use the SpringApplicationBuilder.
The SpringApplicationBuilder lets you chain together multiple method calls and includes parent and child methods that let you create a hierarchy, as shown in the following example:
new SpringApplicationBuilder()
  .sources(Parent.class)
  .child(Application.class)
  .bannerMode(Banner.Mode.OFF)
  .run(args);
A SpringApplication attempts to create the right type of ApplicationContext on your behalf. The algorithm used to determine a WebApplicationType is fairly simple:
If you need to run some specific code once the SpringApplication has started, you can implement the ApplicationRunner or CommandLineRunner interfaces. Both interfaces work in the same way and offer a single run method, which is called just before SpringApplication.run(… ) completes.
The following example shows a CommandLineRunner with a run method:
import org.springframework.boot.*;
import org.springframework.stereotype.*;

@Component
public class MyBean implements CommandLineRunner {
    public void run(String... args) {
         // Do something...
    }
}Each SpringApplication registers a shutdown hook with the JVM to ensure that the ApplicationContext closes gracefully on exit. All the standard Spring lifecycle callbacks (such as the DisposableBean interface or the @PreDestroy annotation) can be used.
This exit code can then be passed to System.exit() to return it as a status code, as shown in the following example:
@SpringBootApplication
public class ExitCodeApplication {
    @Bean
    public ExitCodeGenerator exitCodeGenerator() {
         return () -> 42;
    }

    public static void main(String[] args) {
         System.exit(SpringApplication
          .exit(SpringApplication.run(ExitCodeApplication.class, args)));
    }
}
These are important features of SpringApplication class. If you want to learn more about SpringApplication class then you can check out official documentation atSpring Boot - SpringApplication Class .
In the next article, you will learn how to develop CRUD RESTFul API using Spring boot 2, Hibernate 5, JPA, Maven, and MySQL database.